
Sunday, December 16, 2012
Prepare Group
The Ideal Composition of a Survival Group
Posted on December 16, 2012 by suburbanprep
A survival group is ideally composed of people with different traits and skills. The traits and skills should be complementary. As the same time, the values and beliefs should be similar, so that the goals are aligned and there is harmony in the group. This article talks about the ideal mixed of a survival group.
Ideally, a survival group should be a large family group where all are related by blood or marriage. As a large family group, there is never giving up on each other. A family travels through live together, regardless of change of events. But this is not always possible. In my family, my siblings have no interest in being survival preppers. Nor do they have the discipline and skills to make it work. I love my siblings, and I’ll help them in a time of need. But they can’t and will not be part of my survival group.
A survival group, at the very minimum, should be composed of 6 able-bodied adults, plus their children, plus perhaps their retired parents. Ideally, I’d like to see a survival group composed of 8 to 12 able-bodied adults. 12 able-bodied adults represents 6 possible family group. 6 families is too much to put under one roof. A survival group can exist in multiple houses, if the houses are within a 5 minute walk. The balance in the number of able-bodied adults is the work load versus food production. You need enough working adults to provide security, tend to the garden, earn income, care for children and bed ridden adults, and managed the household. But having more members in your group than can be feed and maintain sanitary requirements puts the entire group at risk.
Also very important in a survival group is obtain the right mix of complimentary skills. The following are the different skill set areas that should be considered with building your survival group.
Leadership – Even in a family group, there must be leaders. Leaders set the standards and provide a mechansim for making hard decisions. During a time of crisis, there is often not enough time for management-by-committee. A leader need not be dictatorial. But rather can lead through example and knowledge. And there can be more than one leader. Each group should attempt to designate a leadership structure and a decision-making path.
Medical Skills – The most idea situation would be for one of the survival group members to be a physician. A nurse practitioners is next best. Then having a registered nurse is next best. As minimum, need someone with abilities to the level of an EMS person plus mid-wife skills. The medical role in your group will need to handle or stabilize trauma, deep cuts, broken bones, chronic illnesses that might exist in your group, infections, infectious waterborne diseases, food poisoning, and the annual flu/cold. The medical role will manage the medical supplies inventory and establish standard for cleanliness and sanitation.
Food Production – Each group should have one or more people with successful experience with large-scale gardening or farming. Animal raising skills are very desirable skills.
Food Preservation – Preserving your food production is essential to a survival group. Having someone experienced will home canning, dehydrating foods, meat jerkies, animal butchering, sausage making, and more are a must-have skill for a group.
Self-defense and Security – One team member should take the lead on self-defense. Ideally this person has vast knowledge and skills with firearms, and is able to teach firearms safety and usage. Ideally this person has a FFL or firearms dealers license, so that guns and ammunition are purchased as wholesale prices. Also having the ability to teach martial arts skills is very desirable. This person will need to manage and oversee the security watches and defense preparations of the homestead. This person will also likely take the lead with hunting efforts.
Communication – This person ideally should have a ham radio license and ham radio equipment. This person will also likely oversee the supply of batteries, hand communication devises, electronic security devices, battery rechargers, and solar power.
Logistics – This is the role that keeps everything organized. This person must be highly organized and disciplined. The stores of long-term food, medical supplies, vitamins, tools, barter items, ammunition, gold & silver coins, fuel storage, and more will be tracked in detail by this person.
Child Care and Home Schooling – This role will take the lead on day-to-day care of young children. And perhaps this person will also manage home schooling of school-age children.
Income Production – Hopefully some of your survival group members will retain their employment or be able to run a home-based business. Recognized that income production is a priority in any group situation. Before TEOTWAWKI, all members of the group will be responsible for their own income production. After TEOTWAWKI, likely that income will be pooled to support the entire group.
Religious Practices – Your group might want to consider having a role as religious leader, if religion is an important element of your group.
Energy Production – At minimum, your survival group will need to obtain, split and store firewood. Perhaps a group member has skills in solar energy. This person will need to have skills in electricity, deep cell batteries, and wiring. Having skills to maintain electrical equipment and motors will put your survival group ahead of the game. Perhaps your group is able to produce bio-diesel, which would be a valuable resource to run vehicles and generators. Other survival groups have the ability to produce hydro-power or wind-generated electricity. Having access to surface coal or a producing propane well is a dream for many survival group.
Construction Skills – Carpentry, plumbing, and electrician skills have multiple benefits. First, you can maintain and grow your homestead. Second, the skills can offered for income or barter. Every group should have some type of handyman to make small repairs and run small projects at the homestead.
Shared Roles and Responsibilities
The following are roles, duties and responsibilities that should be shared across the whole survival group.
Meal Preparation – This duty should be shared, although a few members might cook more often due to having skills and interest
Cleaning and Sanitation – Everyone should have responsibilities for keeping themselves and the homestead clean and disease free.
Water Purification – This is an important daily responsibility that should be rotated Another person should oversee the quality of water, since water is the most important component of any survival situation.
Maintaining Security – Every able-bodied adult should take a security watch. Every able-bodied adult should be prepared to defend their homestead with firearms. Even little grandma should be able to point a 22LR rifle or pistol. Security is shift work. So having a mix of night owls and morning persons would be helpful. There should be check and balances to watch for someone falling asleep or being caught by surprise by an attacker.
Lifting One Another’s Spirits – In a SHTF, WROL, or TEOTWAWKI situation, if will be too easy to become depressed and despondent. Everyone will have a down, bad day. The group must watch out for each other, and raise up the spirits of those having a bad day. Keeping everyone well rested, well feed, and surrounded with loving people goes a long way to keep people in good mind-set.
Tending to the garden or farm – Everyone will need to participate in planting, weeding, and harvesting.
Daily Chores – Every homestead will have a unique set of daily chores that need to be attended to. You might have chickens or rabbits to feed and harvest. You might have cows or goats to milk. Horses require lots of work.
When you have a skills gap in your group, then use targeted learning to gain those skills. Allocate time and funds for a group member to obtain training in a missing skill set. Once you have your survival group brought together into a cohesive organization, start cross training the skills. Never have a single point of failure. If the person with vital skill becomes ill or dies, the other group members should have enough knowledge to continue.
An effective survival group is composed of varying skills. Regardless of skills inventory, every member of the group will need to carry a high workload. Hard work and a team-oriented attitude are the keys to success. Lazy people need not apply to a survival group.

Monday, December 10, 2012
Huskevarna Chain Saw Use and Mainenance for Beginners
Chainsaw Use and Maintenance for Beginners
From SurvivalSherpa
http://survivalsherpa.wordpress.com/2012/12/09/chainsaw-use-and-maintenance-for-beginners/
Here’s TUAK’s very first (and possibly last) how-to essay. If
you already know how to use and maintain a chainsaw, or if you just
don’t have one, proceed no further because this is rather long.
If you do own one and are feeling a bit uncertain on some related matters, click away.
BTW, if you do take the time to read this for information and find it inadequate, please leave a comment as to how it could have been improved. When writing a piece like this it’s very easy to make assumptions about what readers do and don’t already know. Y’know?
This is my Chainsaw. There are many like it, but this one is mine.
 The thing to remember about a chainsaw, in terms of its maintenance,
is that any time you’re using it you’re beating the hell out of it. A
good saw will give you years of good, trouble-free service just like any
tool. But that’s only if you treat it right. You just can’t ignore
maintenance and expect it to keep running, because a little abuse and
neglect goes a long way.
Consider the engine, for example.
 That tiny little single-cylinder, two-stroke sucker can only do its
thing under full-throttle, at which it’s cranking something like 13,000
RPM. The frictional loads it has to deal with are enormous (more on them
later.) It has no liquid coolant, no bath of crankcase oil, and it will
drag six feet of sharpened chain links through hard, seasoned wood all
day long. Or not, depending on whether you do your part.
So let’s go through the parts of the chainsaw, and what care it needs to keep running right.
 This is the drive sprocket, which is where the chain meets the saw.
Depending on the brand of the saw the sprocket can take different forms,
but they all do the same thing. The sprocket links with the drive tabs
on the chain and sends it whipping around the bar at lethally high
speed.
 This is the bar. The chain’s drive tabs run in grooves on the top and
bottom of the bar, and run through a sprocket on the front end. All the
force exerted on the chain causes wear on the bottom side of the bar,
which is why most chainsaw bars are reversible – you can mount it with
either side down. By the end of a long winter, you’ll be happy for that.
Some bars use a “hard nose” design, which eliminates the bar sprocket. They’re more expensive, but get rid of a moving part that’s a common failure point. If you keep the sprocket clean and greased, though, it’s rarely a problem.
 This is the chain tension adjuster. Again, it looks different on
different saws but they all do the same thing. More on chain tension
later.
 This is the air filter. On your car, you’re probably used to not
giving your air filter much thought but that won’t work well on a
chainsaw. The saw works in an incredibly dirty environment, and the
filter is a simple screen. It gets dirty very fast, and needs cleaning
often. The simplest and best way to clean the filter is to spray it out
with air pressure.
 That complicated-looking black thing in front of the upper handle is
the actuator for the chain brake. If the chain hangs up in a piece of
work, the saw will kick back toward you and that’s never a good thing.
That’s fine, but there are issues. If you ever try to rotate the chain on the bar and it won’t move, check the chain brake actuator first. Just try to move it toward the rear of the saw. If it moves backward with a solid click, you just fixed the problem.
Also, and this is very important: On Husqvarna saws, the brake band is mounted right on the inside of the sprocket cover. If the brake is actuated, it will be impossible to remove the cover without using force. I can’t tell you how many saws I’ve repaired where people went ahead and applied that force. DON’T DO THAT. On a Husky saw, if you can’t get the cover off the very first thing you should check is whether the chain brake is applied. If it is, turn it off and the cover will come right off.
I don’t know if any other brands use this design. The only one I’ve seen is Husqvarna. But if you’re having trouble getting the cover to want to come off, don’t force it. Check the chain brake.
 This is the bar oil reservoir. Friction between the chain and the bar
produces a lot of heat, and you will tear up both if you don’t keep
them lubricated. All modern chainsaws have automatic oilers so you don’t
have to give bar lubrication much thought as long as the oiler is
working, but you do want to keep sure that it is working. If you’re ever
not sure, just aim the end of the bar at an uncluttered patch of ground
while the saw is running and hit the throttle. At full speed, the chain
should lay a line of oil on the ground. If it doesn’t, stop cutting
till you find out the problem.
 As you can imagine, all that centrifugal force wants to send oil
flying everywhere. That’s why bar oil is specially formulated to be
extra sticky compared to motor oil. It’s more expensive, but this isn’t a
place to save pennies because bars and chains are even more expensive.
Much more. Make sure you keep oil in the reservoir.
 This is where the mixed fuel goes.
 Remember that the chainsaw’s engine has no crankcase. It’s lubricated
through the fuel. You must not ever run straight gasoline in a
chainsaw. So you’ll need a dedicated fuel container and a supply of mix
oil. Mix your fuel according to the instructions on the oil bottle. When
in doubt, too much oil is better than too little. Too much will cause
your engine to run a little smoky and possibly, eventually, clog the
spark arrester on the muffler. Too little will cause your engine to
seize, and convert your expensive saw into an unusually dirty paper
weight.
 And of course this is the chain. The chain must be sized correctly
for the saw and bar, and the cutting links must be kept sharp. If you
find the saw reluctant to cut, or if the chain starts trying to burn its
way through wood, the chain is dull and must be sharpened.
We could do a whole article on just this one part: Different sizes and types of chains, how to size them, how to sharpen them. We don’t have space for any of that. When in doubt, consult your dealer. But I will say one thing here about dull chains. When you cut with a dull chain, you’re doing more than burning wood and tearing up cutting links. In order to cut with a dull chain, you need to bear down on the saw, right? When you do that, you’re taking months of life not just off the chain, but also off the bar, the drive sprocket, and the engine. Think of that burning smell you detect as being the smell of burning money, and then stop cutting until you can sharpen the chain. Most serious chainsaw users keep several chains around. They’re easy to swap out.
Okay, let’s get to work!
 To mount the chain, orient the chain so the cutting blades on the top
of the chain face toward the front of the saw. NOTE: It is possible to
mount the chain backward. This doesn’t really hurt anything, but the saw
won’t cut. To repeat: the cutting blades on the top of the chain should
face the front of the saw.
Now wrap it around the drive sprocket, making sure the drive tabs mate with the slots in the sprocket.
 Now put the bar in place on the bar studs. Push it all the way to the
rear at first, and don’t worry about connecting it with the tensioner.
Drape the chain on the bar so it engages with the upper slot and the bar
sprocket. The bottom part of the chain should hang down loose.
 Now gently pull the bar forward, and engage it with the stud of the
tension adjuster. On some saws, the adjuster is on the sprocket cover so
you’ll need to install the cover for this step. If you run out of chain
before you can get the stud through the hole in the bar, back off the
adjuster by turning it counterclockwise. At this point, the chain should
still be quite loose.
 If you haven’t already, go ahead and mount the sprocket cover now.
Don’t tighten the nuts, because we still need to adjust the chain
tension.
 Pull up gently on the chain. If the drive tabs come out of the bar
groove, the chain is too loose. So rotate the chain tension adjuster
clockwise, which will move the bar outward and tighten the chain. Do
this gently: You don’t want the chain too tight.
 When gently pulling on the chain causes the drive tabs to come up off
the bar but not all the way out of the groove, you’re about right. Now
rotate the chain on the bar. It should move freely.
If it doesn’t, check the chain brake. If the chain brake is not actuated, you’ve done something wrong. Back up and find the problem. Don’t try to use the saw unless the chain is rotating freely on the bar.
Starting the Saw
 All set? Okay! Having checked your fuel, bar oil and chain tension,
it’s time to fire this bad boy up. Starting a cold chainsaw engine comes
in two stages. Do it right, and we’ll have you going in no time. Screw
it up, and you’ll flood the engine. You don’t want to do that.
Step 1:
Make sure the chain brake is OFF.
Push the power switch to the ON position. Pull out the choke lever. Leave the throttle alone. Hold the saw down with one hand, and pull the starter cord sharply with the other. After two or three pulls, the engine should start and immediately die. That’s fine, that’s just what it’s supposed to do. You just properly primed the fuel system.
NOTE: Some chainsaws have primer bulbs to help this process along. I dislike this feature a great deal because they don’t really help things, they make it easy to flood the engine without ever pulling the starter cord, and they’re a common failure point. But if you’ve got one, you’ve got one. Read and follow the directions carefully.
Step 2:
Open the choke. On some models you can do this by flicking the throttle trigger. On others, you need to push the choke lever in. Hold the saw down with one hand, and pull the starter cord sharply with the other. After two or three pulls, the engine should start and keep running.
Individual chainsaws develop personalities. Some saws like a little throttle to get started at this stage, but it should still idle with your finger off the trigger. If you must give the engine some throttle, be mindful of where the bar and chain are. If you goose the throttle, the chain will spin. That can ruin your whole day if you’re not ready for it.
That’s almost it! You’ve got a running chainsaw in your hands, so you really shouldn’t be reading this right this minute. Just a few more words:
First: If you have trouble starting the saw, you’re running the risk of flooding the engine. If you can’t start the engine and you start smelling gasoline, stop immediately. You flooded it. Remove the top cover, remove the spark plug, and note that the electrodes are all covered with liquid fuel. The engine will never start once that happens. Dry the plug electrodes carefully. Then before re-installing the plug, pull the starter several times to run air through the cylinder and try to get any liquid fuel out of there. Re-install the plug and cover and go back to Step 1.
While you’re using the saw, periodically stop the saw to check and adjust the chain tension. Chains stretch. A chain that’s too loose will come right off the bar. It will damage the chain and may damage you.
I have actually met someone who tried to adjust the chain tension while the engine was running. Only the one guy, though, because almost everybody is smarter than that.
A Word About Spark Arresters
 At the outlet of the muffler, you will find a little removable
screen. That’s the spark arrester, and it does just what the name
implies.
Sometimes at the shop we got customers who complained that they could start their saw easily enough but it wouldn’t develop any RPMs or power. Most often, the fix for this was very simple. Remove the small screw(s) holding the arrester screen in place, and pull it out with small pliers. If the screen is clear, that’s not your problem. But often you’ll find that the screen is clogged. This is caused by too much oil in the fuel mix. It doesn’t do any serious harm, but the engine won’t run right until you clean the screen.
That goop is burned on. The best way I’ve found to clean it is to heat it red-hot with a propane torch, then scrape it clean with a wire brush or screwdriver.
A Word About Cleanliness
A chainsaw works in a terribly dirty environment, and it will get terribly dirty. Some parts need to kept reasonably clean or they won’t work right. Most of this is common sense. The air filter, for example: You should clean it after every session. The engine draws a great deal of air through a tiny carburetor inlet, and you’ll be surprised how fast the filter can clog. NEVER EVER RUN THE ENGINE WITHOUT A GOOD FILTER.
On my older Husky 55 the chain tension adjustment point is between the saw and the bar, a dumb design they changed on the newer models. Dirt just packs in there, and I have to scrape it out several times a session. You get used to it.
Obviously, you need to clean all around the bar, chain and drive sprocket inside the sprocket cover. Dirt and sawdust mixes with bar oil at this point and it doesn’t just drift in, it’s apparently packed in under great pressure. Keeping this area completely clean requires a level of OCD your humble writer does not possess. But at a minimum you do need to keep it from packing up so deep that it starts impeding moving parts, okay?
At the point where the bar is pinched against the saw, there’s a little slot where the bar oil comes out to lube the bar and chain. Check this any time you have the bar off, to make sure it isn’t getting clogged with dirt. That’s a common way for the automatic bar oiler to fail.
Make sure dirt and sawdust doesn’t start packing between the heat sink fins on the engine’s cylinder head. It’s an air-cooled engine, which means air has to be able to get in there. Packed crud in there can ruin the engine forever.
 Don’t forget the starter mechanism, on the opposite side of the saw
from the sprocket cover. From time to time, remove the starter and make
sure dirt, sawdust and twigs aren’t getting involved with the starter
cord. Most designs have a couple of centrifugally-actuated levers that
can become too dirty to do their trick: Make sure they remain free on
their springs. Also, from time to time pull out the cord all the way and
make sure it isn’t fraying. A frayed cord should be replaced as soon as
possible because they do break. When it breaks, there’s no more saw for
you.
Storage
Do I really need to tell you that you shouldn’t leave your chainsaw outdoors? Yet people do, and suffer the consequences, and the main reason is that automatic oiler. The big problem with chainsaw storage is that they tend to leak oil at all times, and bar oil is insidious stuff. Like I said earlier, it’s stickier than regular oil and harder to clean out of other materials.
Get your chainsaw its own container. You will thank yourself for this. Regular chainsaw cases, though expensive, are a very good investment in chainsaw longevity. Personally, I use a big Rubbermaid tub in which I store the saw and all its tools, spares and materials like bar oil, mix oil, and fuel. That way, in addition to keeping it out of the weather and ensuring it doesn’t make a mess, I always know where all the other bits are.
Fuel
Leave it in the sun, or just leave it laying around for a few months, and gasoline goes bad. Not being a chemist, I can’t tell you why this is and don’t care. All I know is two things: Bad gas smells really foul, and it’s death to chainsaws.
Chainsaws use diaphragm-type carburetors, which are extremely sensitive to bad gas. Bad gas attacks the diaphragms, turning them stiff and brittle and incapable of doing their thing. It can also do other bad things to your saw, but that’s the most common and it’s a show-stopper. A good shop can get you running again, but it’s really best to prevent the problem.
Two rules, which you break at your peril:
1.Always check your fuel by smell before pouring it into your saw.
2.Never store a saw long-term with fuel in it.
When you’re getting ready to store your saw, empty the fuel tank. Then start the engine and run it until it dies for lack of fuel. It won’t hurt anything, but leaving the fuel in there might.
 For gasoline that’s going to be around for a while, go to an auto
parts store and get yourself a bottle of fuel stabilizer. Then use it
faithfully. You will look so much smarter if you do this.
Speaking of Spares…
Here’s a list of things I always keep on hand, to make sure I can cut wood any time I want to:
Chains: I like to have at least five on hand, but I heat with shaggy-bark Juniper which is as chainsaw-unfriendly a wood as exists anywhere. You should have at least two or three chains.
Spark plug
Air filter: Not essential, but removes the temptation of continuing work with a damaged or over-clogged filter.
Starter cord: Believe me. Sooner or later you’ll want this.
Mix oil, obviously
Bar oil. If you find yourself completely without bar oil, clean motor oil is better than nothing but it doesn’t work as well. You shouldn’t use substitutes here. Also, I’ve met some people who think this is a good place to recycle dirty used motor oil. They’re wrong.
As for tools, the only tool not associated with chain sharpening you really need is a flat-blade screw driver and two sockets, one for the bar nuts and one for the spark plug. The screwdriver will do double duty for scraping out the worst of the built-up crud. If you buy your saw new it will probably come with a gadget called a “Scrench,” which has all three tools built into one.
That’s all I can think of right now. If you read this and found a question unanswered, please leave your question in the comments because I’m trying to make this as complete as possible without making it 10,000 words long.
Thanks for reading! Let’s be careful out there.
If you do own one and are feeling a bit uncertain on some related matters, click away.
BTW, if you do take the time to read this for information and find it inadequate, please leave a comment as to how it could have been improved. When writing a piece like this it’s very easy to make assumptions about what readers do and don’t already know. Y’know?
This is my Chainsaw. There are many like it, but this one is mine.

Consider the engine, for example.

So let’s go through the parts of the chainsaw, and what care it needs to keep running right.


Some bars use a “hard nose” design, which eliminates the bar sprocket. They’re more expensive, but get rid of a moving part that’s a common failure point. If you keep the sprocket clean and greased, though, it’s rarely a problem.


REMEMBER: IF YOU LOSE CONTROL OF EITHER HANDLE WHILE THE CHAIN IS MOVING, MR. CHAINSAW IS NO LONGER YOUR FRIEND.
The idea is that your hand will slip off the upper handle and bump
the brake actuator. If that black actuator gets bumped it will click
forward and lock a brake band around a drum, preventing the drive
sprocket from rotating. It’s kind of a complicated mechanism, but when
it’s working right that will make the chain stop moving right away.That’s fine, but there are issues. If you ever try to rotate the chain on the bar and it won’t move, check the chain brake actuator first. Just try to move it toward the rear of the saw. If it moves backward with a solid click, you just fixed the problem.
Also, and this is very important: On Husqvarna saws, the brake band is mounted right on the inside of the sprocket cover. If the brake is actuated, it will be impossible to remove the cover without using force. I can’t tell you how many saws I’ve repaired where people went ahead and applied that force. DON’T DO THAT. On a Husky saw, if you can’t get the cover off the very first thing you should check is whether the chain brake is applied. If it is, turn it off and the cover will come right off.
I don’t know if any other brands use this design. The only one I’ve seen is Husqvarna. But if you’re having trouble getting the cover to want to come off, don’t force it. Check the chain brake.


We could do a whole article on just this one part: Different sizes and types of chains, how to size them, how to sharpen them. We don’t have space for any of that. When in doubt, consult your dealer. But I will say one thing here about dull chains. When you cut with a dull chain, you’re doing more than burning wood and tearing up cutting links. In order to cut with a dull chain, you need to bear down on the saw, right? When you do that, you’re taking months of life not just off the chain, but also off the bar, the drive sprocket, and the engine. Think of that burning smell you detect as being the smell of burning money, and then stop cutting until you can sharpen the chain. Most serious chainsaw users keep several chains around. They’re easy to swap out.
Okay, let’s get to work!

Now wrap it around the drive sprocket, making sure the drive tabs mate with the slots in the sprocket.


If it doesn’t, check the chain brake. If the chain brake is not actuated, you’ve done something wrong. Back up and find the problem. Don’t try to use the saw unless the chain is rotating freely on the bar.
Starting the Saw

Step 1:
Make sure the chain brake is OFF.
Push the power switch to the ON position. Pull out the choke lever. Leave the throttle alone. Hold the saw down with one hand, and pull the starter cord sharply with the other. After two or three pulls, the engine should start and immediately die. That’s fine, that’s just what it’s supposed to do. You just properly primed the fuel system.
NOTE: Some chainsaws have primer bulbs to help this process along. I dislike this feature a great deal because they don’t really help things, they make it easy to flood the engine without ever pulling the starter cord, and they’re a common failure point. But if you’ve got one, you’ve got one. Read and follow the directions carefully.
Step 2:
Open the choke. On some models you can do this by flicking the throttle trigger. On others, you need to push the choke lever in. Hold the saw down with one hand, and pull the starter cord sharply with the other. After two or three pulls, the engine should start and keep running.
Individual chainsaws develop personalities. Some saws like a little throttle to get started at this stage, but it should still idle with your finger off the trigger. If you must give the engine some throttle, be mindful of where the bar and chain are. If you goose the throttle, the chain will spin. That can ruin your whole day if you’re not ready for it.
That’s almost it! You’ve got a running chainsaw in your hands, so you really shouldn’t be reading this right this minute. Just a few more words:
First: If you have trouble starting the saw, you’re running the risk of flooding the engine. If you can’t start the engine and you start smelling gasoline, stop immediately. You flooded it. Remove the top cover, remove the spark plug, and note that the electrodes are all covered with liquid fuel. The engine will never start once that happens. Dry the plug electrodes carefully. Then before re-installing the plug, pull the starter several times to run air through the cylinder and try to get any liquid fuel out of there. Re-install the plug and cover and go back to Step 1.
While you’re using the saw, periodically stop the saw to check and adjust the chain tension. Chains stretch. A chain that’s too loose will come right off the bar. It will damage the chain and may damage you.
I have actually met someone who tried to adjust the chain tension while the engine was running. Only the one guy, though, because almost everybody is smarter than that.
A Word About Spark Arresters

Sometimes at the shop we got customers who complained that they could start their saw easily enough but it wouldn’t develop any RPMs or power. Most often, the fix for this was very simple. Remove the small screw(s) holding the arrester screen in place, and pull it out with small pliers. If the screen is clear, that’s not your problem. But often you’ll find that the screen is clogged. This is caused by too much oil in the fuel mix. It doesn’t do any serious harm, but the engine won’t run right until you clean the screen.
That goop is burned on. The best way I’ve found to clean it is to heat it red-hot with a propane torch, then scrape it clean with a wire brush or screwdriver.
A Word About Cleanliness
A chainsaw works in a terribly dirty environment, and it will get terribly dirty. Some parts need to kept reasonably clean or they won’t work right. Most of this is common sense. The air filter, for example: You should clean it after every session. The engine draws a great deal of air through a tiny carburetor inlet, and you’ll be surprised how fast the filter can clog. NEVER EVER RUN THE ENGINE WITHOUT A GOOD FILTER.
On my older Husky 55 the chain tension adjustment point is between the saw and the bar, a dumb design they changed on the newer models. Dirt just packs in there, and I have to scrape it out several times a session. You get used to it.
Obviously, you need to clean all around the bar, chain and drive sprocket inside the sprocket cover. Dirt and sawdust mixes with bar oil at this point and it doesn’t just drift in, it’s apparently packed in under great pressure. Keeping this area completely clean requires a level of OCD your humble writer does not possess. But at a minimum you do need to keep it from packing up so deep that it starts impeding moving parts, okay?
At the point where the bar is pinched against the saw, there’s a little slot where the bar oil comes out to lube the bar and chain. Check this any time you have the bar off, to make sure it isn’t getting clogged with dirt. That’s a common way for the automatic bar oiler to fail.
Make sure dirt and sawdust doesn’t start packing between the heat sink fins on the engine’s cylinder head. It’s an air-cooled engine, which means air has to be able to get in there. Packed crud in there can ruin the engine forever.

Storage
Do I really need to tell you that you shouldn’t leave your chainsaw outdoors? Yet people do, and suffer the consequences, and the main reason is that automatic oiler. The big problem with chainsaw storage is that they tend to leak oil at all times, and bar oil is insidious stuff. Like I said earlier, it’s stickier than regular oil and harder to clean out of other materials.
Get your chainsaw its own container. You will thank yourself for this. Regular chainsaw cases, though expensive, are a very good investment in chainsaw longevity. Personally, I use a big Rubbermaid tub in which I store the saw and all its tools, spares and materials like bar oil, mix oil, and fuel. That way, in addition to keeping it out of the weather and ensuring it doesn’t make a mess, I always know where all the other bits are.
Fuel
Leave it in the sun, or just leave it laying around for a few months, and gasoline goes bad. Not being a chemist, I can’t tell you why this is and don’t care. All I know is two things: Bad gas smells really foul, and it’s death to chainsaws.
Chainsaws use diaphragm-type carburetors, which are extremely sensitive to bad gas. Bad gas attacks the diaphragms, turning them stiff and brittle and incapable of doing their thing. It can also do other bad things to your saw, but that’s the most common and it’s a show-stopper. A good shop can get you running again, but it’s really best to prevent the problem.
Two rules, which you break at your peril:
1.Always check your fuel by smell before pouring it into your saw.
2.Never store a saw long-term with fuel in it.
When you’re getting ready to store your saw, empty the fuel tank. Then start the engine and run it until it dies for lack of fuel. It won’t hurt anything, but leaving the fuel in there might.

Speaking of Spares…
Here’s a list of things I always keep on hand, to make sure I can cut wood any time I want to:
Chains: I like to have at least five on hand, but I heat with shaggy-bark Juniper which is as chainsaw-unfriendly a wood as exists anywhere. You should have at least two or three chains.
Spark plug
Air filter: Not essential, but removes the temptation of continuing work with a damaged or over-clogged filter.
Starter cord: Believe me. Sooner or later you’ll want this.
Mix oil, obviously
Bar oil. If you find yourself completely without bar oil, clean motor oil is better than nothing but it doesn’t work as well. You shouldn’t use substitutes here. Also, I’ve met some people who think this is a good place to recycle dirty used motor oil. They’re wrong.
As for tools, the only tool not associated with chain sharpening you really need is a flat-blade screw driver and two sockets, one for the bar nuts and one for the spark plug. The screwdriver will do double duty for scraping out the worst of the built-up crud. If you buy your saw new it will probably come with a gadget called a “Scrench,” which has all three tools built into one.
That’s all I can think of right now. If you read this and found a question unanswered, please leave your question in the comments because I’m trying to make this as complete as possible without making it 10,000 words long.
Thanks for reading! Let’s be careful out there.
Sunday, December 9, 2012
Heating with Wood
Comparing Fuel Costs
 In the winter of 2007/2008 the costs of
home heating rose dramatically in the U.S., particularly for those
homeowners who used fuel oil or propane for heating. According
to the Energy Information Administration (part of the U.S. Dept. of
Energy) the average cost of residential home heating oil in the U.S.
in February of 2008 was $3.40 per gallon. This represents a 94%
increase in price from just one year before. Homeowners who used
propane did not fare a lot better. The cost of propane was $2.55
per gallon which represents a 52% increase in the cost of propane in
one year.
Given these dramatic rises in the cost of home heating many homeowners are considering switching to wood as a way of heating their homes. The key question is does this make economic sense? In order to answer that question there are a number of factors to consider:
- How efficient is your stove or fireplace? Probably the most critical factor is the efficiency of your wood stove or wood furnace. If you just have a standard open fireplace it is almost certainly not efficient enough to use economically for home heating. On the other hand most modern wood stoves are between 60% - 80% efficient. One option you might want to consider if you have a standard fireplace is a fireplace insert. Inserts are relatively easy to add to an existing fireplace and are nearly as efficient as wood stoves.
- Do you have the ability to harvest wood locally? In rural parts of the country there are often free sources of wood either on your own property or in publicly accessible national forests. If your wood is free then the economics are always better. However, be honest with yourself. Consider the time it is going to take you to harvest the wood, cut it and stack it. In some cases you will be better off buying it given the labor costs even when it is free.
- What is the cost of a cord of wood or other bio fuels in your area? such as sawdust pellets or corn kernels? The average cost of firewood in the U.S. in 2008 is about $190 a cord. However, prices varied considerably by region. There is also a lot of misleading terminology when it comes to buying firewood. Make sure the vendor is using a standard cord which is 4x4x8 feet and includes a significant amount of hard wood, not just lightweight pulp wood. If you are using a pellet stove then you need to see what the price of the pellet fuel is for your area, though this tends not to vary as much as the price of firewood.
- How much space do you have to heat and how much of it would be heated by a wood stove? Generally, the larger your home the better the economics of heating with wood start to be. However, in many homes the floor plan is such that there a single stove cannot heat all of the rooms. In these situations you need to look at using a woodstove with a fan to get better heat distribution or possibly consider a wood furnace which can be hooked up to your forced air heating system.
In order to compare the cost efficiencies of different kinds of heating approaches you need to translate the fuel metrics into a common measurement of heat. The best metric to use is the BTU (British Thermal Unit). Then what you need to understand is the equivalents between the different fuels in terms of the number of BTU's in a cord of fire wood We have already done this analysis for you in the table below:
| Type of Fuel | Compare Energy in BTU's for 1 Cord of Wood |
| #2 Fuel Oil (in gallons) | Divide by 175 |
| Coal (in pounds) | Divide by 1600 |
| Natural Gas (thousands of cubic ft.) | Divide by 28 |
| Propane Gas (in gallons) | Divide by 220 |
| Electricity (in kilowatts) | Divide by 6,500 |
In order to get an accurate comparison you have to account for the fact that wood stoves vary greatly in their efficiency as compared to an oil furnace. In order to make your comparison more accurate first divide the estimate of the number of cords (5.7 cords in this example) by the efficiency rating of your wood stove. In this example, if the wood stove is 70% efficient then 5.7 divided by 0.70 = 8.14 cords. In other words it is actually going to take 8.14 cords of wood to provide the heat you need given that the wood stove is not completely efficient. Now you can re-run your estimate. 8.14 cords of wood at $190 per cord equals a total wood cost of $1,546 as compared to $3,400 for fuel oil. This means that at current prices heating with wood is less than half the cost of heating with fuel oil! Quite a difference!
You can use this approach with any of the fuels listed in the above table and quickly calculate how cost efficient wood would be as a heating source compared to what you are using now. To be completely accurate you should include the cost of a new wood stove if you don't have one. However, that cost should be very low when annualized given that most good wood stoves can last a lifetime. Also, keep in mind that the above example was calculated on prices as of February 2008. It is highly likely that fuel oil costs will probably continue to rise significantly in the future. It is also probable that wood prices will go up with demand, though it is unlikely that they will go up as dramatically as oil and natural gas since wood is a renewable resource.
Saturday, December 8, 2012
Backwoods Resources
Well Germantown is not exactly backwoods, but this is great resources here, the dehydrating and pressure canning sections are great.
http://www.backwoodshome.com/articles2/aldridge138.html
http://www.backwoodshome.com/articles2/aldridge138.html
Wednesday, December 5, 2012
Prepper Links
November Prepper Links: Gear
- An Unusual Tool for the Bug Out Bag
- Shooting, Hunting, and Prepping: Another 550 Cord Use; A Great Bow String Substitute
- Making a Bola
- Just what exactly is a rocket stove?
- 25 Practical Survival Uses For Duct Tape
November Prepper Links: Food, Food Storage, & Herbs
- WHY Can’t I *Can* that?
- How to start your own chicken flock
- Turn a Can Tab into a Survival Fish Hook IM
- How to Render and Can your own Lard
- Weevils: Learn to Love the Bugs Or Do Something About It
- Amy and Toby: Canned Food Storage
- Chia seeds are the ultimate survival food for long-term storage
- Individual Preparedness Program: My Primal Preparedness Pantry
- Yarrow- Rich in Legend and Medicinal Use
- Storing Oats and Their Differences
- Butchering Chicken Schematic IM
- 9 Vegetables to Grow Indoors
- Diatomaceous Earth: An Introduction SB
November Prepper Links: Strategy & Skills
- Full Spectrum Preparedness Overview IM
- PREPPING MISTAKES: 6 Mistakes Preppers Make That Can Get You Killed
- The 7 Common Mistakes That Every Prepper Makes
- The Homestead Survival: How To Spot A Hidden Handgun & Tips IM
- How Much Land You Need To Be Self-Sufficient IM
- Hillside Homestead: Our Experience Egg Tanning
- Use Your Brains: Tan Your Hides
- Bushcraft and Survival Skills: Preppers Checklist
November Prepper Links: Threats
- BBC News – Second coronavirus death reported
- Ending the Culture of Impunity
- Book Review: Daemon, by Daniel Suarez SB
- Just in case (radiation prep) IM
- Think Sandy Was Devastating? Nuclear Attack a Real Risk, Experts Warn
- Deadly antibacterial chemical triclosan found in human breast milk, blood plasma
- Prepping for Catastrophic Threats: Beyond Beans and Bullets SB
November Prepper Links: Independent Income
Monday, December 3, 2012
Sunday, December 2, 2012
Fruit Tree Blossoming
http://www.starkbros.com/blog/fruit-tree-blooming-bearing-problems/?utm_medium=email&utm_campaign=Blog%20Post%20Blooming%20and%20Bearing%20Problems&utm_content=Blog%20Post%20Blooming%20and%20Bearing%20Problems%20CID_2eafbaf1503dd9a2b4ae7fe81bafe188&utm_source=Newsletter&utm_term=Read%20more
Fruit Tree Blooming and Bearing Problems – And How to Solve Them!
 “Why won’t my tree bloom or bear fruit?”
This is a common and frustrating question for any grower. You’ve planted your fruit or nut tree. It’s growing. It’s living. But it’s not blooming or bearing fruit. While this can discourage a grower to the point of wanting to chop the tree down, you should go for the facts, not the axe! If your fruit (or nut) tree doesn’t bloom or bear, it isn’t unusual, and it can happen for a number of reasons. In this article, we focus on some of the most common issues and how you can address them.
Requirements for fruit production
1. Tree DevelopmentIf your fruit or nut tree is still too young, it won’t go into fruit-production mode. When you receive your tree from Stark Bro’s, it will be around 2 years old and will still need a few years before reaching its fruiting maturity. Check out our article, How Many Years?, for more information about how long it takes for different trees to bear before deciding your tree has bearing problems.
2. Pollination
Fruit and nut trees require pollination to be able to set fruit. If your tree is not self-pollinating, it needs a compatible pollinator planted nearby. Also, pollination helpers like bees, birds and wind need to be adequately present. If your tree is missing these important elements, it may bloom profusely, but it will most likely never set fruit. Read The Importance of Fruit Tree Pollination to learn more.
3. Hardiness Zones
Each variety of trees has recommended hardiness zones for planting. You can find tips to help you find your hardiness zone by reading Fruit Tree Care: Planting in the Zone. Once you know what your zone is, you will be able to select fruit and nut trees that will grow in your area.
There are different things to consider when you plant in your zone:
- Trees must be hardy to your zone for a chance to survive winters and summers.
- Trees must get adequate chill hours to produce fruit. Chill hours are based on temperatures that stay 45ºF and below for hours consecutively during the tree’s dormant period. If the tree is hardy to your zone but does not meet its chill-hour requirement, its fruit production will suffer. As a general rule, most peaches and almonds have a low chill-hour requirement, most apples and walnuts are in the middle, and most pears and hazelnuts have a high chill-hour requirement.
- Weather can greatly affect fruit production. If a late frost zaps your tree’s blossoms or young fruit, then it will not be able to produce a crop for you to harvest that year. If a drought or intense heat damages your trees and their blossoms or young fruit, you simply have to wait and hope for more favorable weather next year.
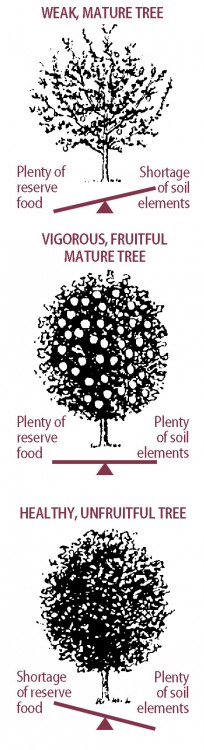
It is very important that your trees have the right balance of reserve food and soil elements. As you can see in the graphic, if this balance is off, it can have a negative impact on how your tree blooms or bears.
If a tree has plenty of reserve food but a shortage of soil elements, you may see a stunted crop of undersized, poor-quality fruit. You might even see no fruit at all. This can happen if your tree has tried to overbear, which may cause a tree to drop its fruit prematurely. It may also happen if your tree has experienced foliage-depletion, which can be caused by stress, weather or other weakening factors like animals, pests or disease. Identifying the stress factor and treating it can help to remedy the problem. You can perform soil tests to find nutrient deficiencies. You should also consider a regular spray schedule to control pests and disease.
A tree can also have an excess of soil elements but not enough reserve food. The tree will appear to be healthy and lush during the growing season, but it will not bear fruit (even if it is mature) since, in most cases, the tree doesn’t bloom. This happens as a result of “over-feeding.” If the soil provides plenty of nutrients, like nitrogen (either naturally or by adding fertilizer), the tree puts on vigorous vegetative growth that will delay the growth of fruiting buds. You can remedy this problem by holding off on fertilizing, pruning the roots or scoring your trees.
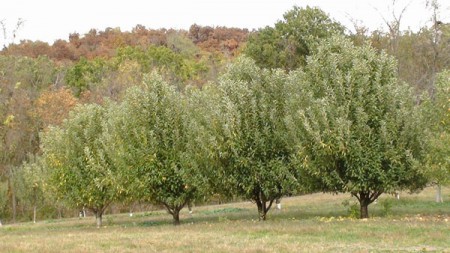
Healthy and Lush Apple Trees but no Apples
Scoring: This has the same result as root pruning. When scoring your trees, bring a small knife (like a pocket-knife) out to your tree. Locate a spot low on the trunk and cut a single horizontal line into the bark, only halfway around the tree. Move up several inches and repeat this, but halfway around the other direction. Do not let these lines connect to one another. See the animated image as a reference for scoring the tree.

Demonstration of Tree-Scoring
Regularly pruned trees are much more apt to produce quality fruit. Fruiting buds tend to form on limbs that have adequate air circulation and light infiltration, enabled by pruning. Learn about pruning tips and more in our article, Successful Tree Pruning.
You also have to make sure that you find the right balance for pruning. Heavy over-pruning can make a tree too vegetative, and under-pruning can contribute to overbearing and fruit drop.
6. Spacing
Fruit and nut trees that are planted too close to one another will compete for nutrients and light. If they are planted too close to buildings and other structures, they will have similar conflicts. Make sure you give your trees enough room to grow and flourish. For an easy-to-follow guide to tree-spacing, explore our article about Fruit Tree Sizes.
If you keep these instances in mind, then you will have a better understanding of why a fruit or nut tree does not bear. Nip a potential problem in the bud and exercise your patience (not your lumberjack-swing). Your trees will thank you!
-------------------------------------------------------------------------------------------------
Jay Parks on said:
What are the “soil elements” you mentioned?

Hey there Jay! The soil
elements are the macro- and micronutrients that are naturally occurring
in the soil or are added through fertilizers and other soil-conditioning
additives.
For example: Nitrogen, Phosphates, and Potash found in most common fertilizers would be considered soil elements when they are feeding your tree.
For example: Nitrogen, Phosphates, and Potash found in most common fertilizers would be considered soil elements when they are feeding your tree.
Subscribe to:
Posts (Atom)