
DIY Stonehenge
Old Noaa Sun position calculator
http://www.esrl.noaa.gov/gmd/grad/solcalc/azel.html
New Noaa Sun position calculator
http://www.esrl.noaa.gov/gmd/grad/solcalc/


Introductory Astronomy: Stonehenge
Procedure
First, review the behavior of the sun during the year by filling in the following table.
Celestial Sphere Coordinates of the Sun
| Date | Name | Right Ascension (hours) | Declination (degrees north or south) |
| March 21 | Spring Equinox | ||
| Summer Solstice | |||
| Autumn Equinox | |||
| Dec. 21 |
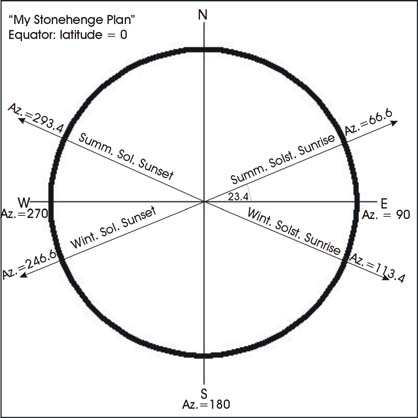
Write some azimuths around the green portion of your solar motion demonstrator. Fill in the following table using your solar motion demonstrator tool. Each tick represents 10 degrees. Try to estimate the azimuths to the nearest degree. The Keck telescope is located on the big island of Hawaii.
Sunrise/set azimuths using solar motion device
| Location | Latitude | Az. of summer sol. sunrise | Az. of winter sol. sunrise | Az. of summer sol. sunset | Az. of winter sol. sunset |
| Equator | 0.0 | ||||
| Pullman | 46.8 | ||||
| Stonehenge | 51.2 | ||||
| Anchorage | 60.5 |
- D is the maximum deviation from due east (for example, the sunrise azimuths will be 90 degrees plus and minus this number for summer and winter, respectively),
- o is the tilt of the Earth's axis away from the ecliptic, 23.5 degrees, and where
- L is the latitude of the observatory.
Refined azimuths using trig. formula
| Location | Latitude | D (from formula) | Az. of summer sol. sunrise (90-D) | Az. of winter sol. sunrise (90+D) | Az. of summer sol. sunset (270+D) | Az. of winter sol. sunset (270-D) |
| Equator | 0.0 | |||||
| Pullman | 46.8 | |||||
| Stonehenge | 51.2 | |||||
| Anchorage | 60.5 |
Next, using a ruler and protractor, sketch in lines of sight for the following observatory plans for each of 4 phenomena listed in the above tables. The first one, for the equator, is done for you, as a model.
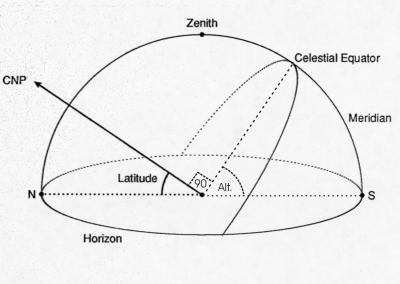
Finally, note that, as in the figure below, if you look north, at the celestial north pole (CNP), the altitude of the CNP above the horizon is the same as the observer's latitude. (This checks for the equator, where the CNP is right on the horizon, and for the north pole, where the CNP is exactly overhead). Furthermore, the angle between the CNP and the celestial equator must always be 90 degrees. So if the sun is on the celestial equator then its noontime altitude can be found by adding all the angles: (Latitude) + (90) + (Sun Alt.) = (180).
Noontime sun altitudes
| Location | Latitude | Alt. of spring equinox noon sun | Alt. of summer solstice noon sun | Alt. of fall equinox noon sun | Alt. of winter solstice noon sun |
| Equator | 0.0 | ||||
| Pullman | 46.8 | ||||
| Stonehenge | 51.2 | ||||
| Anchorage | 60.5 |

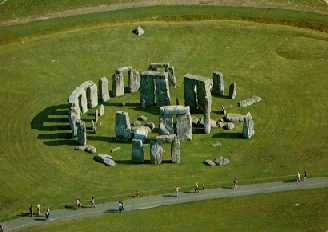
Figure: The early Stonehenge. The illustration shows several stages of construction at the site. The first of these, "Stonehenge I," is an earthwork ring about 100m in diameter and 2m high. Its completeness was broken (as of about 2400 BC) by a single gap directed in the approximate direction of an outlying marker called the Heel Stone. In this gap, excavation has uncovered a grid of post holes: the remains, it seems, of an effort to mark the northernmost excursion of the moon. Note that the Heel Stone lies slightly away from a line drawn from the center of the earthwork ring to the horizon point marking the midsumer (solstitial) sunrise; in 2400 BC the Heel Stone was presumably more erect, and thus the alignment was more nearly perfect. Stonehenge I also included a circle of chalk-filled holes now named after John Aubrey. At some later time, Stonehenge II was added. It comprises two mounds of earth, covering some of the chalk-filled holes, and also the so-called station stones. As shown in the illustration, these additions to the site mark out the corners of a rectangle whose sides and diagonal align with various risings and settings of the sun and moon. In about 2100 BC, Stonehenge III was constructed at the center of the site (shown by the circle of dashes). Stonehenge III is the megalithic structure that draws our attention to the site today. [From "The Great Copernicus Chase" by Owen Gingerich, 1992, Sky Publishing Corp.]
Age: 8 and up
Time: 1 to 2 hours
Type of Activity: Science
Materials needed:
- Center stake for reference point.
- 50 feet of rope.
- 20 to 30 marker stones or small stakes.
- A compass.
The first thing you'll need to do is create a viewing circle. Anchor a reference stake at the center point of the circle and place your compass on top of it. Find due north and place a marker at 50 feet north of the center. Repeat the process for east, west and south. (The rope is used as a guide to insure that all markers are equidistant from the center stake.) Again, using the rope as a guide, place a small marker stone every few feet around the perimeter of your circle. The center of the circle now becomes your fixed reference point and the westward facing perimeter is where you'll be placing the sunset markers.
The calendar can be started at any time, but the solstice sunsets are the most fun. Mark the point of sunset with a pole, stake or other (not easily moved) marker. Tag the marker with the date of sunset.
Repeat the process every seven days or so. Over the weeks and months you'll note that the sun appears to "walk" faster at some times of the year than others. When you've finished (in a year's time) you'll have a working astronomical calendar and an excuse to invite friends and classmates over to the house to check the date.
Non-construction alternatives
- Photo-op: Take a snapshot of the western skyline and tape it to the wall by a western facing window. With a felt tip marker draw an arrow on the photo corresponding to the point of sunset and note the date. Repeat the process.
- Window marks: (This takes two people.) Standing at the same point in the room of a western facing window, have the other person make a small mark on the glass where the sun sets. Note the date and repeat the process on a weekly basis.
The principle behind an astronomical calendar is simple. The apparent rising and setting horizon point of the sun changes with each passing day. The different points correspond to different days of the year.
At minimum, an astronomical calendar only requires a fixed reference point for viewing and another fixed reference point marking the position of the rising and/or setting sun on the horizon.
In the Northern Hemisphere, if you were to watch a time-lapse movie of a year's worth of sunsets, you would notice that the sun appears to "walk" back and forth across the western horizon. The winter solstice marks the southern limit of the sun's journey and the summer solstice is the northern boundary. Closer examination would reveal that, with the exception of the two solstice extremes, every other point on the horizon is crossed twice during the course of the year. Once on the southern march and again on the northern return.
At the time of the winter and summer solstices, (around December 22 and June 22) the sun is directly overhead at either the Tropic of Cancer (summer) or the Tropic of Capricorn (winter). In the Northern Hemisphere these dates mark the beginnings of summer and winter and the days of the longest and shortest hours of daylight.
No comments:
Post a Comment
Drop a comment here.